A beautiful tufted headboard for “You”!
When I was in photography class, my teacher once told us, essentially, a great picture has to stand on its own. That is, the judge of its merit does not care if, while preparing for the shot, you had to wait in the rain, play in nasty chemicals, throw your back out, or endure any of a variety of unpleasantries. The only thing that matters is the end portrait.
I’m pretty sure I’ve touched upon this before and you might ask why I am touching upon it today. Well, that’s because, while I hope you enjoy the end results of my work, I also thought you might enjoy seeing some behind the scenes shots as well. You see, when my professor taught me that nobody cares about how you went about getting the portrait, he forgot one possibility: What if one enjoyed the process and wants to share it with others? And the particular process I am documenting here today might even serve to enhance photos of “You”!
Not long ago, I was contemplating some of my portrait studio props. Now that’s kind of a broad statement, as I am always contemplating my props. More specifically, I noticed we needed a more inviting, plush headboard for our “You” by Abanathy Photography, LLC intimate photo sessions. The kind of headboard I wanted is tufted kind and, most of the time, these cost a pretty penny. So I did a little searching online for solutions to this need. What I found was perfect: I could just build one!
To give credit where it is due, I found the perfect video on Youtube (DIY Tufted Headboard Tutorial) where it shows the step-by-step process for making exactly what I wanted. Luckily the batting and twine were relatively inexpensive. Plus, I already had a spare piece of plywood and most of the necessary tools so I was already on my way to making this a “win” for our props budget!
The only real cost dilemma was going to be the foam. Now, for whatever reason (most say because it is petroleum-based) cushion foam is relatively EXPENSIVE! This is especially so when you need one this large and at least 3 inches thick. That is why I did not ask too many questions when I found the perfect size for a reasonable cost on Amazon.com. Same went for the DIY covered button portion of the project. I bought in bulk and saved not only money, but also time, as every package brought together from local vendors would not have been enough to make this happen.

So, with supplies in hand and others on the way, I went to work in the garage carefully cutting the board to height and form before later adhering and trimming the foam. Following a little mathematical translation (as the video is for a king size headboard and this is a full), I marked, cored, and drilled the button locations using a makeshift drill accessory.


The last part of the garage work was wrapping the foam in two layers of batting. This went fairly smooth before I brought the whole thing into the house to keep dirt and dust from the white fabric.

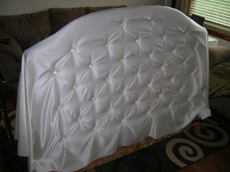
Now, this is likely the only time I will find sawhorses in our living room. The headboard could not yet support itself and these were the only things I had with the support necessary to hold the headboard upright and stable while I pushed, pulled and stapled the buttons and twine.
This part was relatively easy, but it took some time. I centrally positioned the fabric and began working my way out from center, tufting with the covered buttons. Let’s put it this way, I believe I got through somewhere between two and three movies during this part. Lastly, I pulled the loose fabric around and stapled it in place.

Voilà! A DIY tufted headboard for our wonderful “You” sessions. I would say “the project was not too difficult”, however, I am speaking from a lineage of DIY projects that loved to throw curve balls. In fact, as DIY projects go, this might just be the first I’ve had where I didn’t get hung up on any step and everything went just as planned. In fact, it went so smoothly, that I have had ideas for at least a couple more!
Anyway, I will let one final image attest to the beautiful accessory this offers to our “You” sessions. Pictured is one of our models posing in front of the headboard. I think it accentuates the image wonderfully. What do you think?

Also, don’t forget, this is the perfect time to book a “You” session! It is warm outside giving the perfect studio setting for an intimate shoot. Whether you are looking for a unique gift on your upcoming wedding night (anniversary), you want to get an early start on Valentine’s Day, or you just want to look and feel beautiful for a couple of hours, this is the time! Book a session with “You” by Abanathy Photography, LLC today!!